Free online image edge refiner. Just drag and drop your image here and it will automatically get smoothed edges. You can adjust the pixel removal and smoothing radius, thereby clearing more or fewer pixels on the edges of the image objects. Created by engineers from team Browserling.
Free online image edge refiner. Just drag and drop your image here and it will automatically get smoothed edges. You can adjust the pixel removal and smoothing radius, thereby clearing more or fewer pixels on the edges of the image objects. Created by engineers from team Browserling.

This tool refines the edges of objects in images with a transparent background. The program removes blurry edges, fixes fuzzy outlines, removes noise pixels (often inherited from JPEG format), and erases the outline of the previous background (often left after background removal around objects). The program smooths out jagged lines and removes unwanted pixels, returning a clean result at the output. Edge refinement has two stages. The first stage is the complete removal of pixels on the object outline (turning pixels into transparent ones). The second stage is the smoothing of pixels on the object outline (turning pixels into semi-transparent ones). Each stage of refinement can be customized in the options by specifying the radius of action. For example, if the object of the image has a thin line of indistinct pixels on the edges, then a radius of removal of 1 pixel and a radius of smoothing of 1 pixel will be sufficient. If the object has a lot of noise pixels on the edges, it is better to apply refinement with a radius of 3 or 4 pixels. You can skip one of the refinement stages, and use only the one you prefer. The program also has an option for refining only the outer outline of objects. It removes and smoothes only those pixels on the edges that have contact with the background around the object. Additionally, the tool offers an option for refining edge pixels, allowing you to choose whether to refine the edges of objects that touch the image border. The resulting image with a transparent background can be downloaded in PNG or WebP format. If you later want to add a background to the object, you can use the Add Image Background tool. Image-abulous!
This tool refines the edges of objects in images with a transparent background. The program removes blurry edges, fixes fuzzy outlines, removes noise pixels (often inherited from JPEG format), and erases the outline of the previous background (often left after background removal around objects). The program smooths out jagged lines and removes unwanted pixels, returning a clean result at the output. Edge refinement has two stages. The first stage is the complete removal of pixels on the object outline (turning pixels into transparent ones). The second stage is the smoothing of pixels on the object outline (turning pixels into semi-transparent ones). Each stage of refinement can be customized in the options by specifying the radius of action. For example, if the object of the image has a thin line of indistinct pixels on the edges, then a radius of removal of 1 pixel and a radius of smoothing of 1 pixel will be sufficient. If the object has a lot of noise pixels on the edges, it is better to apply refinement with a radius of 3 or 4 pixels. You can skip one of the refinement stages, and use only the one you prefer. The program also has an option for refining only the outer outline of objects. It removes and smoothes only those pixels on the edges that have contact with the background around the object. Additionally, the tool offers an option for refining edge pixels, allowing you to choose whether to refine the edges of objects that touch the image border. The resulting image with a transparent background can be downloaded in PNG or WebP format. If you later want to add a background to the object, you can use the Add Image Background tool. Image-abulous!
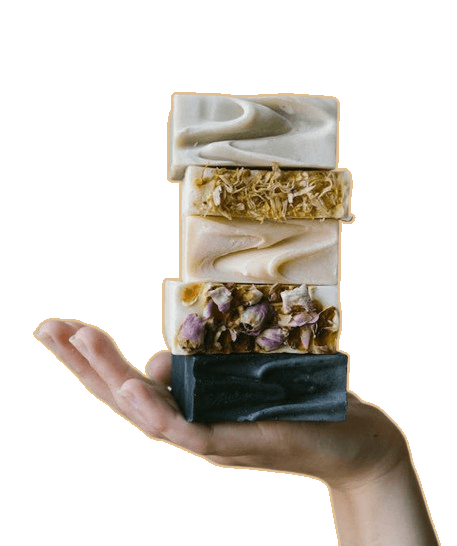
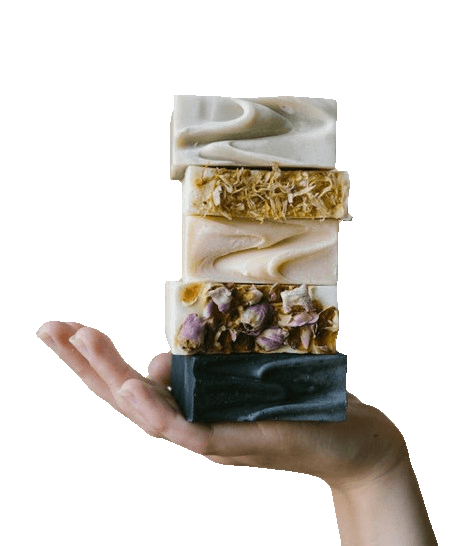
In this example, we upload a photo of a homemade soap product for sale in our store. After removing the background, there is still a thin line of the previous background around the hand and soap. So, we use the refine edges tool to clean up this line. We apply the pixel removal mode on the edges, set an edge radius of 3 pixels, and get a perfectly clean image of the soap. To prevent pixel removal from being applied to the bottom part of the image, we turn off the "Refine Pixels on Image Edge" option. (Source: Pexels.)
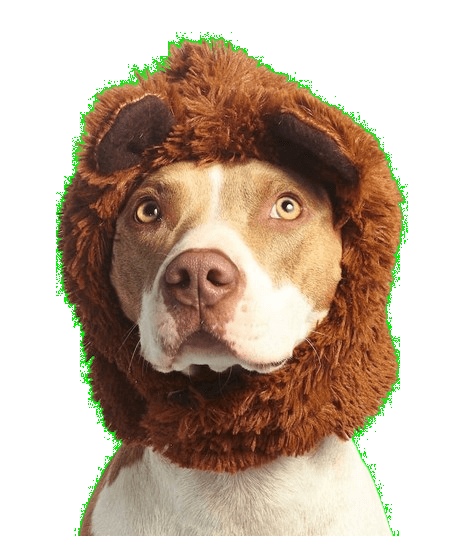
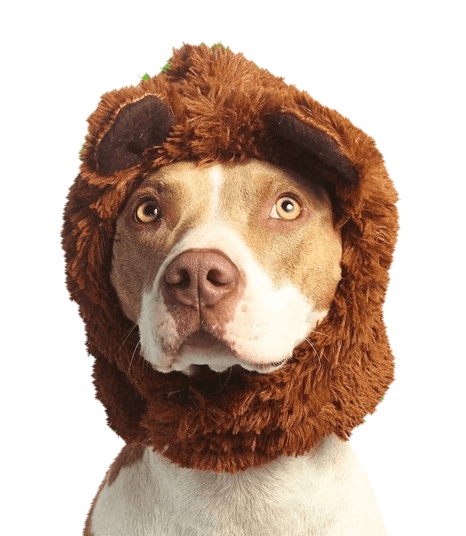
In this example, we remove the remnants of the chroma key from a portrait of a beloved dog. The green screen pixels are randomly surrounding the dog's head. To get rid of them, we apply two stages of edge refinement. First, we turn all pixels that fall within a 4-pixel line at the edges transparent. Then, we smooth the next 2 layers of pixels, making the edges of the dog semi-transparent. Since the bottom of the image is cropped and does not have green screen remnants, we disable the refine edge pixels option. The output is an excellent result with an image of the dog without a chroma key. (Source: Pexels.)
In this example, we clean up Muhammad Ali's signature from white noise pixels on the edges. These pixels are formed as a result of creating a digital signature, when the white background is removed. We use the "Refine Edges" tool with a removal radius of 2 pixels and a smoothing radius of 1 pixel to refine the edges and obtain a clean and crisp black electronic signature. (Source: Wikipedia.)
Edit images in your browser.
Place images on a grid so that they make a Fibonacci spiral.
Convert a PNG image to an ICO icon.
Convert an ICO icon to a PNG image.
Convert a PNG image to a TIFF image.
Convert a TIFF image to a PNG image.
Convert a JPEG image to an ICO icon.
Convert an ICO icon to a JPEG image.
Convert a JPEG image to a TIFF image.
Convert a TIFF image to a JPEG image.
Convert a GIF image to an ICO icon.
Convert an ICO icon to a GIF image.
Convert a GIF image to a TIFF image.
Convert a TIFF image to a GIF image.
Convert a GIF image to an APNG icon.
Convert an APNG image to a PNG image.
Convert a bitmap image to an ICO icon.
Convert an ICO icon to a bitmap image.
Convert a bitmap image to a TIFF image.
Convert a TIFF image to a bitmap image.
Convert a Webp image to an ICO icon.
Convert an ICO icon to a Webp image.
Convert a Webp image to a TIFF image.
Convert a TIFF image to a Webp image.
Create an animated GIF image from static frames.
Create an image from an B, G, R array.
Create an image from an R, G, B, A array.
Create an image from an B, G, R, A array.
Increase the quality of an image.
Decrease the quality of an image.
Remove the pixelation effect from an image.
Remove the blur effect from an image.
Apply OCR on an image and extract all text from it.
Erase text or label from an image.
Erase any object from an image.
Convert an image to a thumbnail
Convert a PNG, GIF, JPG or BMP to glitch art.
Let Zalgo destroy an image.
Change an image color space to HSL, HSV, CMYK, or RGB.
Change an image bit depth to 32, 24, 16, 8, 4, 2 bits or just 1 bit.
Create a mosaic wall from multiple images.
Create an ASCII art image from a regular image.
Create an ANSI art image from a regular image.
Create a Unicode art image from a regular image.
Create a Braille art image from a regular image.
Add a short one-line label to an image.
Remove a watermark from an image.
Create an image made out of dots of varying size and spacing.
Convert an image to a bunch of blocks.
Create a GIF from the original image with interlacing effect.
Subscribe to our updates. We'll let you know when we release new tools, features, and organize online workshops.
Enter your email here
We're Browserling — a friendly and fun cross-browser testing company powered by alien technology. At Browserling we love to make people's lives easier, so we created this collection of image editing tools. Our tools have the simplest user interface that doesn't require advanced computer skills and they are used by millions of people every month. Our image tools are actually powered by our web developer tools that we created over the last couple of years. Check them out!


