᠎᠎᠎          

Transparent image creator

World's simplest image tool
Free online transparent image maker. Just drag and drop your image here and it will automatically get a transparent background. You can choose which color and tones of the image to turn into a transparent color, as well as adjust the edges of non-transparent parts of the image and their smoothness. Created by engineers from team Browserling.
Transparency Options
Transparency color. (Use a
color's name, palette, or click
on a color in the input image.)
Similar shade match in
percentage.
Apply the transparent effect
only to the outer parts
of the image.
Object Edges
When a color is removed, increase
the translucency along the edge
of transparent and non-transparent
parts to make a smoother
transition between deleted
and non-deleted pixels.
Set the depth of the translucency
transition between deleted
and non-deleted pixels.
Preview Transparent Pixels
Color the transparent regions in
a dark color for easier visual
inspection.
What format to create a
transparent image in?

What is a transparent image creator?

learn more about this tool
This tool removes colors from an image and makes them transparent. You can use the color picker widget in the options to select the color that should become transparent or you can enter the color's name, its hex or RGB code. Alternatively, you can directly click on a color in the input preview to make it transparent. After selecting the color, you can fine-tune the transparency threshold value. By default, it is set to 10%, meaning that all visually similar color shades within a 10% range of your selected color will also be removed from the image. For example, if you choose blue as the color and set the threshold value to 5%, then the shades of blue, such as navy blue, azure blue, and admiral blue will also get matched. If you want to remove the background surrounding an object, the "External Pixel Coverage" option will be useful. When this option is selected, the program scans the outer edges of the objects in the image and makes only those pixels transparent that are in contact with the edges of the whole image. After removing the necessary color, there may still be pixels of similar shades on the object's edges. To create a smooth and seamless line along the transparent pixels, you can refine them and make them semi-transparent by using the "Make Edges Smooth" option and specifying a smoothness radius. For your convenience, we have also added an option that shows the transparent regions in a dark color. This option only demonstrates the transparency in the output preview and it does not apply to the downloaded image, which can be in PNG or WebP format. Image-abulous!

Transparent image creator examples

Click to use
Remove Image Background
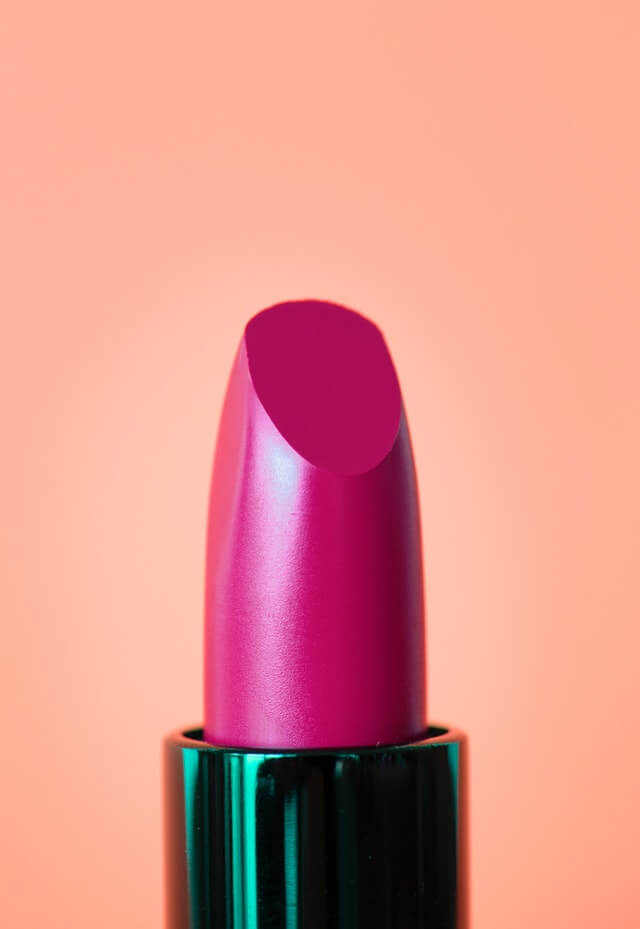
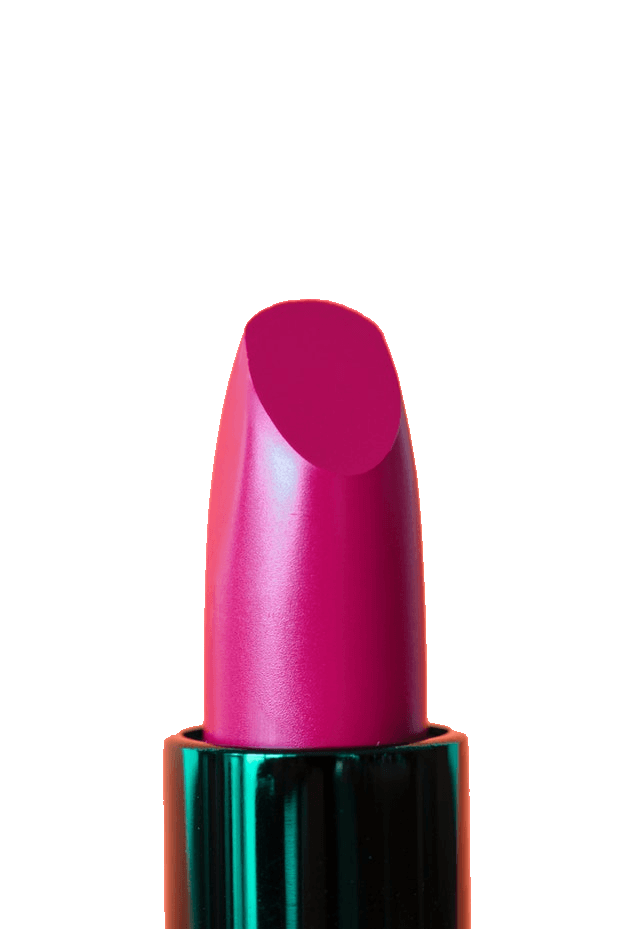
In this example, we convert all the pink background pixels in the image to transparent pixels. As the background uses different shades and tones of pink, we also set the transparency threshold to 15% to match lighter and darker variations of the pink color. (Source: Pexels.)
Required options
These options will be used automatically if you select this example.
Transparency color. (Use a
color's name, palette, or click
on a color in the input image.)
Similar shade match in
percentage.
Apply the transparent effect
only to the outer parts
of the image.
When a color is removed, increase
the translucency along the edge
of transparent and non-transparent
parts to make a smoother
transition between deleted
and non-deleted pixels.
Set the depth of the translucency
transition between deleted
and non-deleted pixels.
Color the transparent regions in
a dark color for easier visual
inspection.
Separate Foreground from the Background
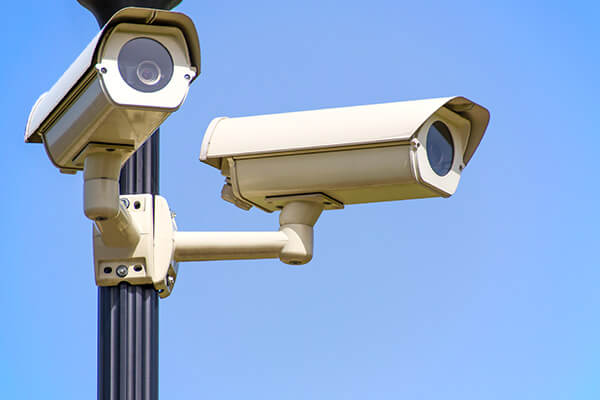
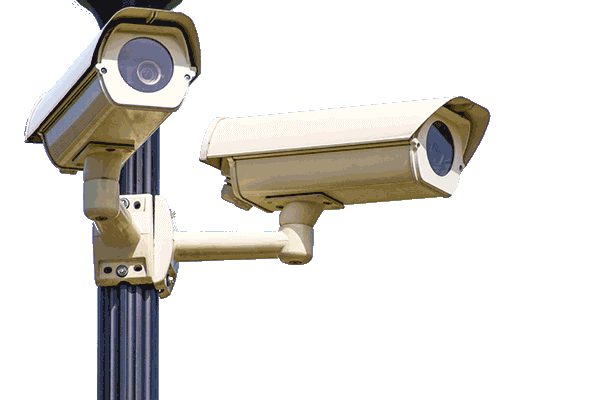
This example separates the security cameras that are in the foreground of the image from the sky that is in the background. To do this, we enter the sky blue hex code #93baf5 in the transparent color option and set the tone match to 12%. (Source: Pexels.)
Required options
These options will be used automatically if you select this example.
Transparency color. (Use a
color's name, palette, or click
on a color in the input image.)
Similar shade match in
percentage.
Apply the transparent effect
only to the outer parts
of the image.
When a color is removed, increase
the translucency along the edge
of transparent and non-transparent
parts to make a smoother
transition between deleted
and non-deleted pixels.
Set the depth of the translucency
transition between deleted
and non-deleted pixels.
Color the transparent regions in
a dark color for easier visual
inspection.
Extract Roses
In this example, we extract red roses from the image. This is done by deleting the iron-gray color (#d7d8da) and its close tones from the image. Additionally, we smooth the pixels along the edge of transparency by using the "Make Edges Smooth" option with a radius of 1 pixel. (Source: Pexels.)
Required options
These options will be used automatically if you select this example.
Transparency color. (Use a
color's name, palette, or click
on a color in the input image.)
Similar shade match in
percentage.
Apply the transparent effect
only to the outer parts
of the image.
When a color is removed, increase
the translucency along the edge
of transparent and non-transparent
parts to make a smoother
transition between deleted
and non-deleted pixels.
Set the depth of the translucency
transition between deleted
and non-deleted pixels.
Color the transparent regions in
a dark color for easier visual
inspection.
Transparent Signature
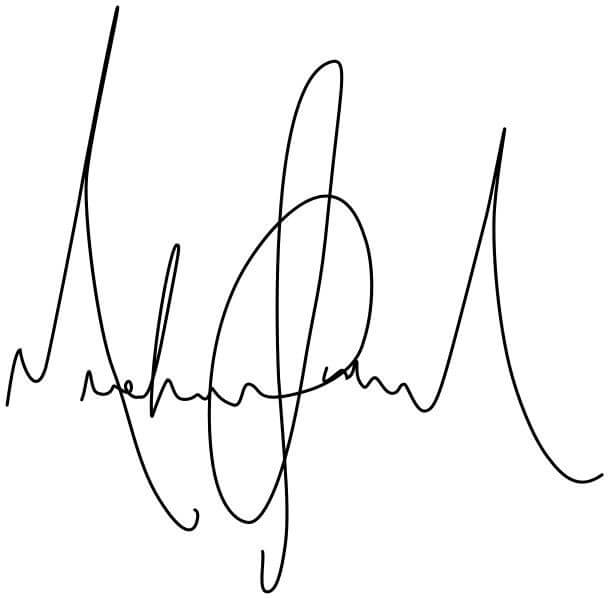
In this example, we upload a scanned image of Michael Jackson's signature on an opaque white background and convert it into a transparent digital signature. We remove all the white pixels that surround the signature by entering the "white" color name in the transparency color option. As the white background may contain some gray pixels (scanning imperfections), we set the color similarity to 15 percent to remove those pixels, too. Additionally, we smooth the thin line of pixels along the edges of the signature to eliminate the noise around the black ink. The output image contains only the black ink and it can now be added as the top layer on any document that needs to be signed. (Source: Wikipedia.)
Required options
These options will be used automatically if you select this example.
Transparency color. (Use a
color's name, palette, or click
on a color in the input image.)
Similar shade match in
percentage.
Apply the transparent effect
only to the outer parts
of the image.
When a color is removed, increase
the translucency along the edge
of transparent and non-transparent
parts to make a smoother
transition between deleted
and non-deleted pixels.
Set the depth of the translucency
transition between deleted
and non-deleted pixels.
Color the transparent regions in
a dark color for easier visual
inspection.
Make Only Outer Pixels Transparent
In this example, we make only the external pixels transparent in the image by using the "External Pixel Coverage" option. This option allows us to remove the outer white-gray pixels of the wall while preserving the same white-gray pixels of the coffee cup and table. We select the color of the wall by simply clicking on the image and add 10% similar shades to the removal. Additionally, we refine the edges of the table by smoothing the edge line by 3 pixels. (Source: Pexels.)
Required options
These options will be used automatically if you select this example.
Transparency color. (Use a
color's name, palette, or click
on a color in the input image.)
Similar shade match in
percentage.
Apply the transparent effect
only to the outer parts
of the image.
When a color is removed, increase
the translucency along the edge
of transparent and non-transparent
parts to make a smoother
transition between deleted
and non-deleted pixels.
Set the depth of the translucency
transition between deleted
and non-deleted pixels.
Color the transparent regions in
a dark color for easier visual
inspection.
All image tools
Didn't find the tool you were looking for? Let us know what tool we are missing and we'll build it!
Quickly pixelate an area of an image.
Quickly blur an area of an image.
Quickly sharpen an area of an image.
Quickly increase or decrease the brightness of an image.
Quickly increase or decrease the contrast of an image.
Quickly rotate any image by an arbitrary angle.
Quickly resize any image to any size.
Quickly create a larger image from a smaller image.
Quickly create a smaller image from a larger image.
Quickly crop an area of any image.
Quickly convert a color image to a grayscale image.
Quickly make multiple copies of an image.
Quickly flip an image horizontally.
Quickly flip an image vertically.
Quickly add text to any image.
Quickly add annotations (text, labels, arrows, boxes) to images.
Quickly add copyright protection to an image.
Quickly hide information in an image by blurring it or blacking it out.
Quickly convert any color in an image to transparent.
Quickly add translucency to the given image.
Quickly make the background of an image transparent.
Quickly add a background to a transparent image.
Quickly change one color to another in any image.
Quickly change the visual quality of any image.
Quickly convert a PNG image to a JPG image.
Quickly convert a JPG image to a PNG image.
Quickly convert a PNG image to a GIF image.
Quickly convert a GIF image to a PNG image.
Quickly convert a PNG image to a BMP image.
Quickly convert a BMP image to a PNG image.
Quickly base64-encode a PNG image.
Quickly decode a base64-encoded PNG image.
Quickly convert a BMP image to a GIF image.
Quickly convert a GIF image to a BMP image.
Quickly convert a JPEG image to a bitmap image.
Quickly convert a bitmap image to a JPEG image.
Quickly base64-encode a BMP image.
Quickly base64-decode a bitmap image.
Quickly convert a JPEG image to a single-frame GIF image.
Quickly convert an animated GIF to a JPEG image.
Quickly convert a GIF to base64 encoding.
Quickly convert a base64 encoding to a GIF.
Quickly view and extract frames from GIF animations.
Quickly play a GIF animation frame by frame.
Quickly base64-encode a JPEG image.
Quickly decode a base64-encoded JPEG image.
Quickly change the compression level of a JPG image.
Quickly make the file size of an image smaller.
Quickly convert an image to base64 encoding.
Quickly convert base64 encoding to an image.
Quickly convert an image to a Data URL.
Quickly convert a Data URL to an image.
Quickly add a border around an image.
Quickly remove the border that surrounds the image.
Quickly make corners of any image rounded.
Quickly generate a random image.
Quickly explode an image into a bunch of tiny pieces.
Quickly cut an image into horizontal or vertical strips.
Quickly convert all colors in an image to just black and white.
Quickly convert a multicolor image to a duotone image.
Quickly convert an image to the binary art.
Quickly run a dithering algorithm on an image.
Quickly decrease the number of colors in an image.
Quickly simplify the color scheme of the image.
Quickly create an empty image of arbitrary size.
Quickly create a one-color image of the desired shade.
Quickly invert all pixels in an image to the opposite color.
Quickly use a color picker to select a color in an image.
Quickly find dominant colors in an image.
Quickly find the tones that form the color palette of the image.
Quickly generate image size, format, pixel, and color palette information.
Quickly open and view images in your browser.
Quickly redraw an image using only web-safe colors.
Quickly separate RGBA, CMYK, and HSL channels from an image.
Quickly show the red, green, blue, and alpha channel of the RGBA color scheme.
Quickly show the hue, saturation, and light channels of the HSL color scheme.
Quickly show the hue, saturation, and value channels of the HSV color scheme.
Quickly show the hue, saturation, and intensity channels of the HSI color scheme.
Quickly show the cyan, magenta, yellow, and key channels of the CMYK color scheme.
Quickly show the lightness, A, and B channels of the LAB color scheme.
Quickly show the luma (Y) and chrominance (I and Q) channels of the YIQ color scheme.
Quickly show the hue, chroma, and luminance channels of the HCL color scheme.
Quickly show the luminance, chroma, and hue channels of the LCH color scheme.
Quickly show the Y (luma), Cb (blue-difference), and Cr (red-difference) channels of the YCbCr color scheme.
Quickly select any object in the image and extract it by its color.
Quickly remove a specific color region from any image.
Quickly remove a green screen from any image.
Quickly remove a chroma key from any image.
Coming soon These image tools are on the way
Image Editor
Edit images in your browser.
Create a Fibonacci Spiral
Place images on a grid so that they make a Fibonacci spiral.
Convert PNG to ICO
Convert a PNG image to an ICO icon.
Convert ICO to PNG
Convert an ICO icon to a PNG image.
Convert PNG to TIFF
Convert a PNG image to a TIFF image.
Convert TIFF to PNG
Convert a TIFF image to a PNG image.
Convert JPG to ICO
Convert a JPEG image to an ICO icon.
Convert ICO to JPG
Convert an ICO icon to a JPEG image.
Convert JPG to TIFF
Convert a JPEG image to a TIFF image.
Convert TIFF to JPG
Convert a TIFF image to a JPEG image.
Convert GIF to ICO
Convert a GIF image to an ICO icon.
Convert ICO to GIF
Convert an ICO icon to a GIF image.
Convert GIF to TIFF
Convert a GIF image to a TIFF image.
Convert TIFF to GIF
Convert a TIFF image to a GIF image.
Convert GIF to Animated PNG
Convert a GIF image to an APNG icon.
Convert Animated PNG to GIF
Convert an APNG image to a PNG image.
Convert BMP to ICO
Convert a bitmap image to an ICO icon.
Convert ICO to BMP
Convert an ICO icon to a bitmap image.
Convert BMP to TIFF
Convert a bitmap image to a TIFF image.
Convert TIFF to BMP
Convert a TIFF image to a bitmap image.
Convert Webp to ICO
Convert a Webp image to an ICO icon.
Convert ICO to Webp
Convert an ICO icon to a Webp image.
Convert Webp to TIFF
Convert a Webp image to a TIFF image.
Convert TIFF to Webp
Convert a TIFF image to a Webp image.
Create an Animated GIF
Create an animated GIF image from static frames.
Create Image from RGB Array
Create an image from an R, G, B array.
Create Image from BGR Array
Create an image from an B, G, R array.
Create Image from RGBA Array
Create an image from an R, G, B, A array.
Create Image from BGRA Array
Create an image from an B, G, R, A array.
Enhance Image Quality
Increase the quality of an image.
Reduce Image Quality
Decrease the quality of an image.
Extract Text from Image
Apply OCR on an image and extract all text from it.
Remove Text from Image
Erase text or label from an image.
Remove Object from Image
Erase any object from an image.
Generate a Custom Image
Create a custom image of any color and width/height.
Adjust Image Hue
Increase or decrease the hue of an image.
Adjust Image Saturation
Increase or decrease the saturation of an image.
Adjust Image Lightness
Increase or decrease the lightness of an image.
Split an Image
Split an image into parts.
Slice an Image
Slice a part of an image.
Skew an Image
Skew an image by the given angle.
Shift an Image
Shift an image to the left or to the right.
Swirl an Image
Create a pixel vortex anywhere in an image.
Create a Thumbnail
Convert an image to a thumbnail
Add Artefacts to an Image
Add compression artefacts to an image.
Create a Glitch Image
Convert a PNG, GIF, JPG or BMP to glitch art.
Run Zalgo on an Image
Let Zalgo destroy an image.
Convert Image Color Space
Change an image color space to HSL, HSV, CMYK, or RGB.
Create a Web-safe Image
Convert the colors in an image to the web-safe color palette.
Convert Image Bits Per Pixel
Change an image bit depth to 32, 24, 16, 8, 4, 2 bits or just 1 bit.
Optimize an Image
Optimize the quality of an image.
Create an Image Mosaic
Create a mosaic wall from multiple images.
Generate ASCII Art from an Image
Create an ASCII art image from a regular image.
Generate ANSI Art from an Image
Create an ANSI art image from a regular image.
Generate Unicode Art from an Image
Create a Unicode art image from a regular image.
Generate Braille Art from an Image
Create a Braille art image from a regular image.
Add a Label to an Image
Add a short one-line label to an image.
Delete a Watermark from an Image
Remove a watermark from an image.
Add Halftone Effect to an Image
Create an image made out of dots of varying size and spacing.
Blockify an Image
Convert an image to a bunch of blocks.
Add Progressive Effect to an Image
Create a GIF from the original image with interlacing effect.