This free online tool lets you add the sharpening effect to a WebP image. Just load your WebP image in the input editor, and you'll instantly get a sharpened WebP image in the output editor. You can adjust the sharpening intensity to achieve the necessary level of detail and choose the shape, position, and size of the sharpening region in the options. Created by team Browserling.
This free online tool lets you add the sharpening effect to a WebP image. Just load your WebP image in the input editor, and you'll instantly get a sharpened WebP image in the output editor. You can adjust the sharpening intensity to achieve the necessary level of detail and choose the shape, position, and size of the sharpening region in the options. Created by team Browserling.

With this online tool, you can add a sharpening effect to your WebP images. You can apply sharpening to the entire WebP or to a selected area by adjusting its shape and position in the options. The most common use cases of this tool are enhancing details in photos that are hard to see, emphasizing details in objects, and improving the overall clarity and focus of WebPs for better visual quality. To use the tool, simply upload a WebP in the input editor and select the shape of the sharpening area in the options. The area can be a rectangle, a square, an ellipsis, or a circle. Then, place the sharpening area in the necessary position. You can do this by either using the interactive draggers that are located in the corners of the sharpening area (in the input editor) or setting the position and size of the sharpening area in the options using numerical values – sharpening area width, height, and starting position as x and y coordinates. You can also invert the sharpening area to enhance the clarity of the background or objects that are outside of the selected shape. The sharpening intensity option allows you to improve the details of the sharpening effect. You can use an intensity value from 0% to 200% (the most commonly used value is 50%). Webp-abulous!
With this online tool, you can add a sharpening effect to your WebP images. You can apply sharpening to the entire WebP or to a selected area by adjusting its shape and position in the options. The most common use cases of this tool are enhancing details in photos that are hard to see, emphasizing details in objects, and improving the overall clarity and focus of WebPs for better visual quality. To use the tool, simply upload a WebP in the input editor and select the shape of the sharpening area in the options. The area can be a rectangle, a square, an ellipsis, or a circle. Then, place the sharpening area in the necessary position. You can do this by either using the interactive draggers that are located in the corners of the sharpening area (in the input editor) or setting the position and size of the sharpening area in the options using numerical values – sharpening area width, height, and starting position as x and y coordinates. You can also invert the sharpening area to enhance the clarity of the background or objects that are outside of the selected shape. The sharpening intensity option allows you to improve the details of the sharpening effect. You can use an intensity value from 0% to 200% (the most commonly used value is 50%). Webp-abulous!
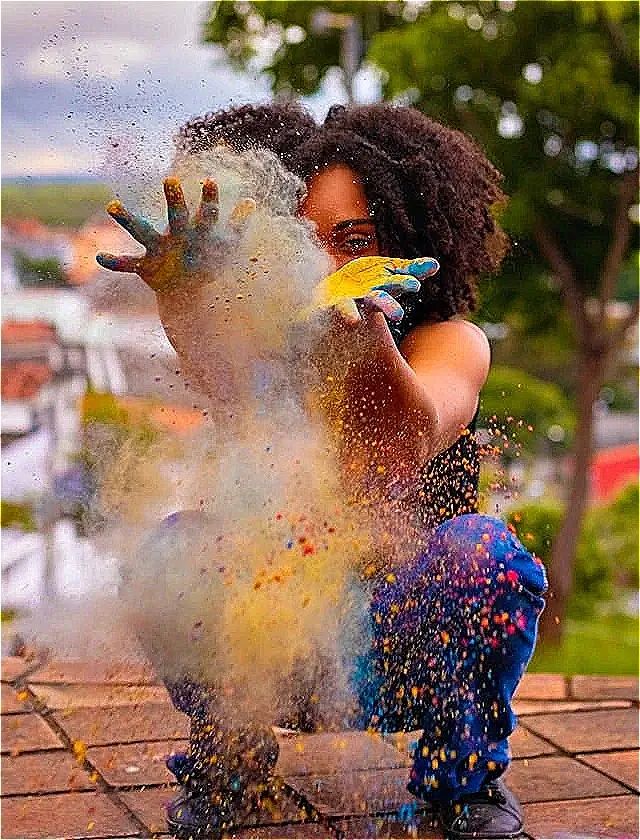
In this example, we apply the sharpening effect with an intensity of 160% to the entire WebP image of a woman celebrating Holi. The sharpening effect enhances the vibrant colors, more vividly conveying the atmosphere of the festival. To quickly cover the entire WebP image, we use a simple trick: we clear position fields, as well as the width and height options. When these fields are empty, the entire WebP is selected. (Source: Pexels.)

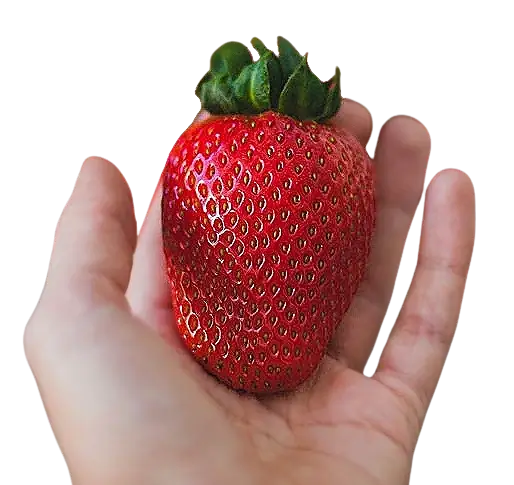
In this example, we apply the sharpening effect only in a specific area of a WebP that has a transparent background. We focus on a large strawberry placed in a hand and enclose it in an oval shape, which is where the sharpening effect is applied. We set the sharpening intensity to 140%, as a result of which the strawberry becomes more detailed, with the seeds and surface details appearing much clearer and distinct. The remaining areas of the WebP that are outside of the oval selector remain unchanged. (Source: Pexels.)

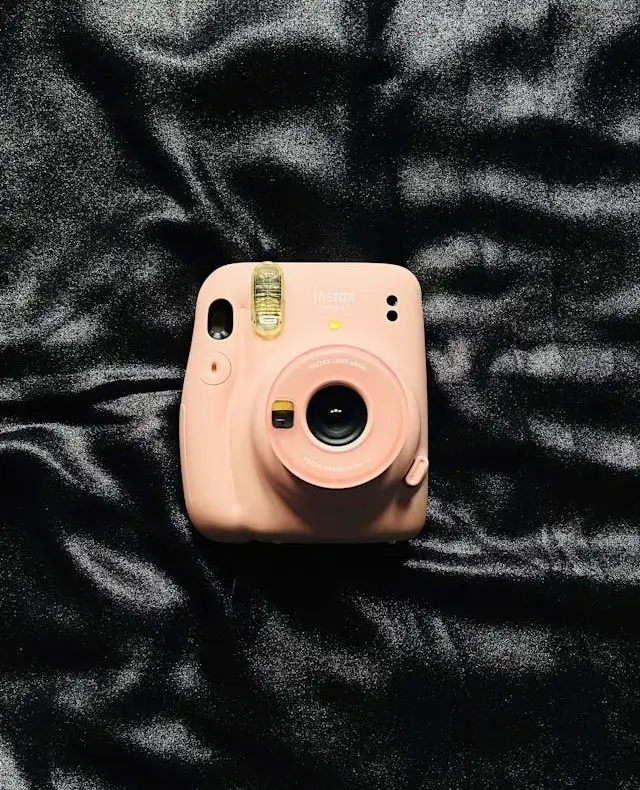
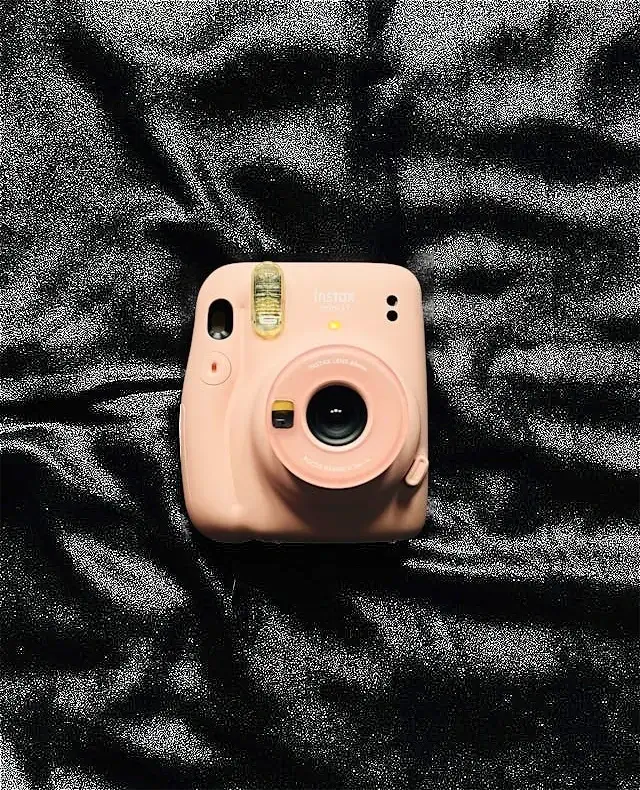
In this example, we apply the sharpening effect to the area outside of the selected rectangular area. To do this, we load a WebP photo of a centered pink camera, select the rectangular shape of the camera in the input editor, and then activate the "Sharpen Outside Region" option. As a result, the sharpening effect with a strength of 120% is applied to the black silk cloth on which the camera is placed, and you can see its texture and fibers much more clearly. (Source: Pexels.)
Edit WebP images in your browser.
Convert a WebP animation to an APNG animation.
Convert an APNG animation to a WebP animation.
Convert a WebP animation to a GIF animation.
Convert a GIF animation to a WebP animation.
Extract all frames from a WebP animation.
Convert a WebP animation to an MP4 video.
Convert an MP4 video to a WebP animation.
Convert a WebP animation to a WebM video.
Convert a WebM video to a WebP animation.
Find the difference between two or more WebP images.
Reduce the file size of a WebP image.
View the metadata information of a WebP image.
Remove all metadata information from a WebP image.
Edit the metadata information of a WebP image.
Play WebP animations frame by frame.
Extract one or more frames from a WebP animation.
Create a WebP animation from a sprite sheet.
Create a sprite sheet from a WebP animation.
View WebP images and in your browser.
Subscribe to our updates. We'll let you know when we release new tools and features, and when we organize online workshops.
Enter your email here
We're Browserling — a friendly and fun cross-browser testing company powered by alien technology. At Browserling we love to make people's lives easier, so we created this collection of WebP editing tools. Our tools have the simplest user interface that doesn't require advanced computer skills and they are used by millions of people every month. Our WebP tools are actually powered by our web developer tools that we created over the last couple of years. Check them out!